
react进阶
一· React 生命周期(待补充)
React 组件的生命周期分为三个阶段:
- 挂载阶段 (Mounting): 组件实例被创建并插入到 DOM 中。
constructor(): 组件构造函数,用于初始化 state 和绑定方法。static getDerivedStateFromProps(nextProps, prevState): 静态方法,在挂载和更新时被调用,用于根据 props 更新 state。render(): 渲染组件的 UI。componentDidMount(): 组件挂载后立即调用,通常用于执行副作用操作,如发起网络请求、订阅事件等。
- 更新阶段 (Updating): 组件因 props 或 state 的改变而重新渲染。
static getDerivedStateFromProps(nextProps, prevState): 与挂载阶段相同。shouldComponentUpdate(nextProps, nextState): 用于控制组件是否需要重新渲染,返回true表示需要更新,返回false则跳过更新。render(): 渲染组件的 UI。getSnapshotBeforeUpdate(prevProps, prevState): 在 DOM 更新之前调用,用于获取 DOM 状态,返回值将作为componentDidUpdate的第三个参数。componentDidUpdate(prevProps, prevState, snapshot): 组件更新后立即调用,通常用于执行副作用操作,如更新 DOM、发起网络请求等。
- 卸载阶段 (Unmounting): 组件从 DOM 中移除。
componentWillUnmount(): 组件卸载前调用,用于清理副作用操作,如取消订阅、清除定时器等。
1.1 废弃的生命周期方法
以下生命周期方法已被废弃,不建议使用:
componentWillMount: 在服务端渲染 (SSR) 中会被多次调用,可能导致重复触发,且绑定事件无法解绑,导致内存泄漏。componentWillReceiveProps: 外部组件频繁更新传入不同的 props,会导致不必要的异步请求。componentWillUpdate: 更新前记录 DOM 状态,但与componentDidUpdate相隔时间过长,可能导致状态不一致。
1.2 新的生命周期方法
getDerivedStateFromProps(nextProps, prevState): 在组件初始化和后续更新过程中被调用,返回一个对象作为新的 state,返回null则说明不需要更新 state。static getDerivedStateFromProps(nextProps, prevState) { if (nextProps.value !== undefined) { return { current: nextProps.value }; } return null; }getSnapshotBeforeUpdate(prevProps, prevState): 在 update 发生时,在 render 之后 DOM 渲染之前被调用,返回一个值作为componentDidUpdate的第三个参数。getSnapshotBeforeUpdate(prevProps, prevState) { // 获取滚动位置 return this.wrapper.scrollHeight; } componentDidUpdate(prevProps, prevState, snapshot) { // 恢复滚动位置 this.wrapper.scrollTop = this.wrapper.scrollHeight - snapshot; }
1.3 示例:滚动位置保持
class MyComponent extends React.Component {
  constructor(props) {
    super(props);
    this.wrapperRef = React.createRef();
    this.state = {
      messages: ['Message 1', 'Message 2', 'Message 3'],
    };
  }

  getSnapshotBeforeUpdate(prevProps, prevState) {
    // 获取滚动容器的当前滚动高度
    return this.wrapperRef.current.scrollHeight;
  }

  componentDidUpdate(prevProps, prevState, snapshot) {
    // 计算新增内容的高度
    const scrollDiff = this.wrapperRef.current.scrollHeight - snapshot;
    // 设置滚动位置,保持用户之前的阅读位置
    this.wrapperRef.current.scrollTop += scrollDiff;
  }

  render() {
    return (
      <div
        ref={this.wrapperRef}
        style={{ height: '200px', overflow: 'auto' }}
      >
        {this.state.messages.map((message, index) => (
          <div key={index}>{message}</div>
        ))}
      </div>
    );
  }
}
二. React 性能优化
shouldComponentUpdate(nextProps, nextState):- 用于手动控制组件是否需要重新渲染。
- 通过比较
nextProps和this.props、nextState和this.state来决定是否更新。 - 如果返回
false,则跳过渲染,包括子组件的渲染。
React.memo(Component, [areEqual]):- 高阶组件,用于缓存函数组件的渲染结果。
- 默认情况下,
React.memo会浅比较 props 的变化,如果 props 没有变化,则跳过重新渲染。 - 可以提供
areEqual函数来自定义比较逻辑。
useMemo(callback, [dependencies])和useCallback(callback, [dependencies]):useMemo用于缓存计算结果,只有当依赖项发生变化时才会重新计算。useCallback用于缓存函数,只有当依赖项发生变化时才会创建新的函数。- 可以避免在每次渲染时都重新创建函数或计算值,提高性能。
三. React Hooks(钩子函数)
3.1 为什么要使用 Hooks?
- 高阶组件为了复用,导致代码层级复杂。
- 生命周期的复杂性。
- 从函数组件改为 class 组件成本高。
3.2 常用的 Hooks
useState(initialState): 保存组件状态。const [state, setState] = useState(initialState);useEffect(effect, [dependencies]): 处理副作用,如数据获取、订阅等。useEffect(() => { // effect return () => { // cleanup }; }, [dependencies]);useLayoutEffect(effect, [dependencies]): 同步执行副作用,在 DOM 更新后立即执行,会阻塞页面渲染。useCallback(callback, [dependencies]): 记忆函数,防止组件重新渲染导致方法被重新创建。const handleClick = useCallback(() => { console.log(name); }, [name]);useMemo(callback, [dependencies]): 记忆组件,缓存计算结果。const memoizedValue = useMemo(() => computeExpensiveValue(a, b), [a, b]);useRef(initialValue): 保存引用值,用于访问 DOM 元素或在组件的整个生命周期中保持一个可变值。const mySwiper = useRef(null); <Swiper ref={mySwiper} />;useReducer(reducer, initialState): 用于管理复杂的状态逻辑。useContext(Context): 用于访问 Context 中的值,减少组件层级。
3.3 useEffect 和 useLayoutEffect 的区别
useEffect在浏览器完成 DOM 更新后异步执行,不会阻塞页面渲染。useLayoutEffect在 React 完成 DOM 更新后同步执行,会阻塞页面渲染。
建议: 优先使用 useEffect,只有在需要同步操作 DOM 时才使用 useLayoutEffect,以避免页面抖动。
3.4 Hooks 的使用规则
- 只能在函数组件或自定义 hook 中调用 Hooks。
- 只能在函数组件的最顶层调用 Hooks,不能在循环、条件语句或嵌套函数中调用 Hooks。
- 自定义 hook 必须以
use开头。
3.5 自定义 Hooks
用于提取组件中的逻辑,使其可以在多个组件之间共享。
import { useState, useEffect } from 'react';

function useFetch(url) {
  const [data, setData] = useState(null);
  const [loading, setLoading] = useState(true);
  const [error, setError] = useState(null);

  useEffect(() => {
    async function fetchData() {
      try {
        const response = await fetch(url);
        const json = await response.json();
        setData(json);
      } catch (error) {
        setError(error);
      } finally {
        setLoading(false);
      }
    }

    fetchData();
  }, [url]);

  return { data, loading, error };
}
四. React 路由
4.1 什么是路由?
路由是根据不同的 URL 地址展示不同的内容或页面。
4.2 安装 React Router
npm install react-router-dom@64.3 使用 React Router
4.3.1 导入路由组件
import {
  BrowserRouter as Router,
  Routes,
  Route,
  Link,
  Navigate
} from "react-router-dom";
4.3.2 定义路由和重定向
<Router>
  <Routes>
    <Route path="/films" element={<Films />} />
    <Route path="/cinemas" element={<Cinemas />} />
    <Route path="/center" element={<Center />} />
    <Route path="/" element={<Navigate to="/films" />} />
    {/* <Route path="*" element={<NotFound />} /> */}
  </Routes>
</Router><Routes>: 用于包裹所有的<Route>组件。<Route>: 定义一个路由,path属性指定 URL 路径,element属性指定要渲染的组件。<Link>: 用于创建链接,类似于 HTML 的<a>标签,但可以避免页面刷新。<Navigate>: 用于重定向,类似于 HTML 的<meta>标签。
4.3.3 嵌套路由
<Routes>
  <Route path="/films/nowplaying" element={<Nowplaying />} />
  <Route path="/films/comingsoon" element={<Comingsoon />} />
  <Route path="/films" element={<Navigate to="/films/nowplaying" />} />
</Routes>
4.3.4 路由跳转方式
声明式导航:
<Link to="/films">Films</Link>
<Link to="/cinemas">Cinemas</Link>
<Link to="/center">Center</Link>
编程式导航:
import { useNavigate } from 'react-router-dom';

function MyComponent() {
  const navigate = useNavigate();

  const handleClick = () => {
    navigate('/center');
  };

  return <button onClick={handleClick}>Go to Center</button>;
}
4.3.5 路由传参
URL 参数:
<Route path="/user/:id" element={<User />} />在
User组件中:import { useParams } from 'react-router-dom'; function User() { const { id } = useParams(); return <div>User ID: {id}</div>; }查询参数:
navigate('/user?day=Friday');在
User组件中:import { useLocation } from 'react-router-dom'; function User() { const location = useLocation(); const queryParams = new URLSearchParams(location.search); const day = queryParams.get('day'); return <div>Day: {day}</div>; }State:
navigate('/user', { state: { day: 'Friday' } });在
User组件中:import { useLocation } from 'react-router-dom'; function User() { const location = useLocation(); const { day } = location.state; return <div>Day: {day}</div>; }
4.3.6 路由拦截 (权限控制)
import { useRoutes } from 'react-router-dom';

function App() {
  let element = useRoutes([
    {
      path: '/center',
      element: isAuth() ? <Center /> : <Navigate to="/login" />,
    },
    // ...
  ]);

  return element;
}
4.4. 项目注意事项
1) 反向代理
在 package.json 文件中添加 proxy 字段:
"proxy": "http://localhost:5000"或者使用 http-proxy-middleware:
npm install http-proxy-middleware --saveconst { createProxyMiddleware } = require('http-proxy-middleware');
module.exports = function(app) {
app.use(
'/api',
createProxyMiddleware({
target: 'http://localhost:5000',
changeOrigin: true,
})
);
};2) CSS Modules
/* MyComponent.module.css */
.title {
  color: red;
}

:global(.active) {
  color: blue;
}
import styles from './MyComponent.module.css';
function MyComponent() {
return <h1 className={styles.title}>Hello</h1>;
}好的,我将对你提供的 Flux、Redux 和 React-Redux 的笔记进行整理、修改和更新,使其更清晰、更易懂,并包含最新的实践和概念。
五. Flux 架构
5.1 什么是 Flux?
Flux 是一种用于构建客户端 Web 应用的架构模式,由 Facebook 提出。它主要解决的是数据流向的问题,通过单向数据流来管理应用的状态,使得应用的状态变化可预测、易于调试和维护。
5.2 Flux 的核心概念
- Action (动作): 描述发生了什么事件,是一个包含
type属性的 JavaScript 对象。 - Dispatcher (调度器): 接收 Action,并将 Action 分发给所有注册的 Store。
- Store (数据存储): 存储应用的状态,并响应 Action 的变化,更新状态并通知 View。
- View (视图): 显示 Store 中的数据,并触发 Action。
5.3 Flux 的单向数据流
View 触发 Action。
Action 被 Dispatcher 接收。
Dispatcher 将 Action 分发给所有注册的 Store。
Store 响应 Action,更新状态。
Store 通知 View,View 重新渲染。
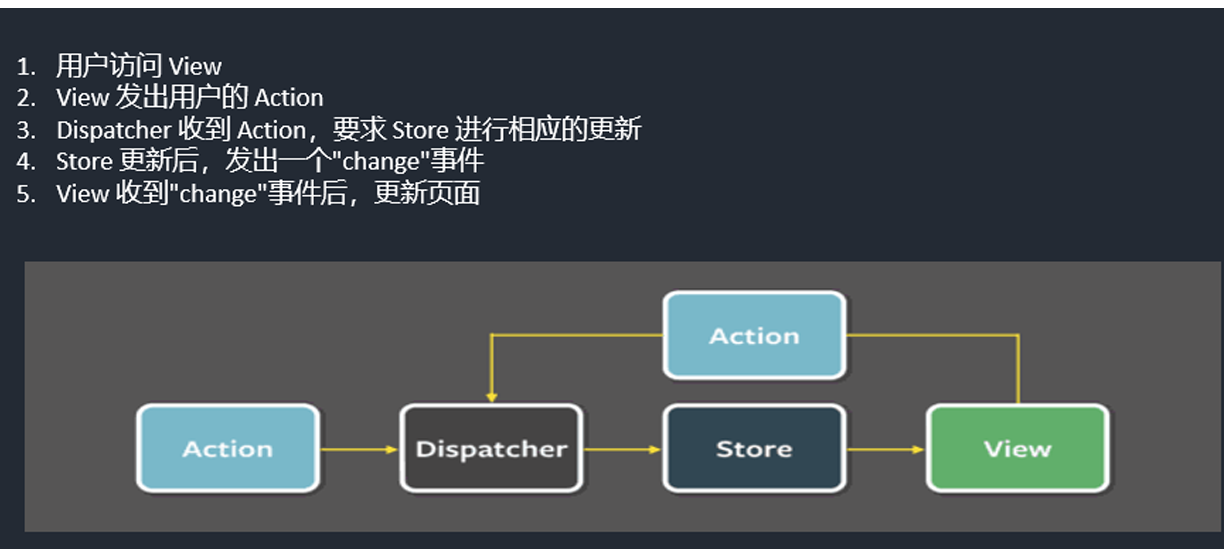
image-20250322152820796
六. Redux
6.1 什么是 Redux?
Redux 是一个 JavaScript 状态容器,用于管理应用的状态。它受到了 Flux 架构的启发,但做了一些简化和改进。Redux 可以与 React、Angular、Vue 等框架一起使用。
6.2 Redux 的三大原则
- 单一数据源 (Single source of truth): 整个应用的状态都存储在一个 JavaScript 对象树中,这个对象树被称为 Store。
- 状态是只读的 (State is read-only): 唯一改变 state 的方法就是触发 action。action 是一个用于描述发生了什么的普通 JavaScript 对象。
- 使用纯函数来执行修改 (Changes are made with pure functions): 为了描述 action 如何改变 state tree ,你需要编写 reducers。
6.3 Redux 的核心概念
- Action (动作): 描述发生了什么事件,是一个包含
type属性的 JavaScript 对象。 - Reducer (归约函数): 接收先前的 state 和 action,并返回新的 state。Reducer 必须是一个纯函数,不能有副作用。
- Store (数据存储): 存储应用的状态,提供
dispatch、subscribe和getState等方法。
6.4 Redux 的工作流程
View 触发 Action。
Action 被
dispatch函数接收。dispatch函数将 Action 传递给 Reducer。Reducer 接收先前的 state 和 action,并返回新的 state。
Store 更新状态,并通知所有订阅者。
View 重新渲染。
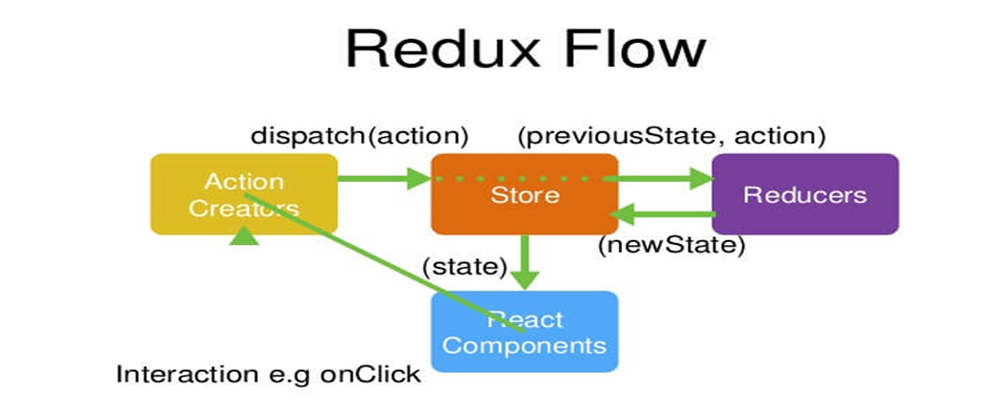
image-20250322152853969
6.5 Redux 的核心 API
createStore(reducer, [preloadedState], [enhancer]): 创建 Redux Store。store.dispatch(action): 触发 Action,将 Action 传递给 Reducer。store.subscribe(listener): 订阅 Store 的变化,当 Store 的状态发生变化时,执行 listener 函数。store.getState(): 获取 Store 的当前状态。combineReducers(reducers): 将多个 Reducer 合并成一个 Reducer。applyMiddleware(...middlewares): 应用中间件,用于扩展 Redux 的功能。
6.6 Redux 中间件
Redux 中间件是在 Action 被 dispatch 之后,Reducer 接收到 Action 之前,对 Action 进行处理的函数。中间件可以用于处理异步操作、日志记录、错误处理等。
6.6.1 常见的 Redux 中间件
redux-thunk: 允许 dispatch 函数。redux-promise: 允许 dispatch Promise 对象。redux-logger: 记录 Redux 的 Action 和 State 变化。
6.6.3中间件的由来与原理、机制
export default function thunkMiddleware({ dispatch, getState }) {
    return next => action => typeof action === 'function' ? action(dispatch, getState) :next(action);
}
这段代码的意思是,中间件这个桥梁接受到的参数action,如果不是function则和过去一样直接执 行next方法(下一步处理),相当于中间件没有做任何事。如果action是function,则先执行action, action的处理结束之后,再在action的内部调用dispatch
6.6.2 自定义 Redux 中间件
const loggerMiddleware = store => next => action => {
  console.log('dispatching', action);
  let result = next(action);
  console.log('next state', store.getState());
  return result;
};
6.7 Redux DevTools Extension
Redux DevTools Extension 是一个 Chrome 浏览器插件,用于调试 Redux 应用。它可以查看 Action 和 State 的变化、进行时间旅行等。
import { createStore, applyMiddleware, compose } from 'redux';
import reducer from './reducer';

const composeEnhancers = window.__REDUX_DEVTOOLS_EXTENSION_COMPOSE__ || compose;

const store = createStore(reducer, composeEnhancers(
  applyMiddleware(/* ...中间件 */)
));

export default store;
七. React-Redux
7.1 什么是 React-Redux?
React-Redux 是一个 Redux 的官方 React 绑定库,用于将 Redux Store 连接到 React 组件。
7.2 React-Redux 的核心概念
- UI 组件 (Presentational Components): 只负责 UI 的呈现,不带有任何业务逻辑,没有状态,所有数据都由 props 提供,不使用任何 Redux 的 API。
- 容器组件 (Container Components): 负责管理数据和业务逻辑,不负责 UI 的呈现,带有内部状态,使用 Redux 的 API。
7.3 React-Redux 的核心 API
<Provider store={store}>: 将 Redux Store 传递给所有容器组件。connect(mapStateToProps, [mapDispatchToProps], [mergeProps], [options])(Component): 将 UI 组件连接到 Redux Store,生成容器组件。mapStateToProps(state, [ownProps]): 将 Redux Store 的 state 映射到 UI 组件的 props。mapDispatchToProps(dispatch, [ownProps]): 将 dispatch 函数映射到 UI 组件的 props。
7.4 React-Redux 的使用
- 创建 Redux Store。
- 使用
<Provider>组件将 Redux Store 传递给所有容器组件。 - 使用
connect函数将 UI 组件连接到 Redux Store,生成容器组件。
import React from 'react';
import ReactDOM from 'react-dom';
import { Provider } from 'react-redux';
import store from './store';
import App from './App';

ReactDOM.render(
  <Provider store={store}>
    <App />
  </Provider>,
  document.getElementById('root')
);
import { connect } from 'react-redux';
import { increment, decrement, reset } from './actionCreators';
const Counter = ({ counter, increment, decrement, reset }) => (
<div>
<h1>{counter}</h1>
<button onClick={increment}>+</button>
<button onClick={decrement}>-</button>
<button onClick={reset}>Reset</button>
</div>
);
const mapStateToProps = state => ({
counter: state.counter
});
const mapDispatchToProps = {
increment,
decrement,
reset
};
export default connect(mapStateToProps, mapDispatchToProps)(Counter);7.5 Hooks API (useSelector, useDispatch)
React-Redux 提供了 Hooks API,可以在函数组件中使用 Redux。
useSelector(selector, [equalityFn]): 从 Redux Store 中提取数据。useDispatch(): 获取 dispatch 函数。
import { useSelector, useDispatch } from 'react-redux';
import { increment, decrement, reset } from './actionCreators';

const Counter = () => {
  const counter = useSelector(state => state.counter);
  const dispatch = useDispatch();

  return (
    <div>
      <h1>{counter}</h1>
      <button onClick={() => dispatch(increment())}>+</button>
      <button onClick={() => dispatch(decrement())}>-</button>
      <button onClick={() => dispatch(reset())}>Reset</button>
    </div>
  );
};

export default Counter;
7.6 高阶组件 (HOC)
connect 函数是一个高阶组件,它接收一个组件作为参数,并返回一个新的组件。高阶组件可以用于代码复用、增加 props、渲染劫持等。Provider组件,可以让容器组件拿到state , 使用了context
高阶组件构建与应用
HOC不仅仅是一个方法,确切说应该是一个组件工厂,获取低阶组件,生成高阶组件。
(1)代码复用,代码模块化 (2)增删改props (3) 渲染劫持
//定义高阶函数
import React from 'react';

// 高阶函数
function Control(WrappedComponent) {
  return class MyControl extends React.Component {
    render() {
      if (!this.props.data) {
        return <div>loading...</div>;
      }
      return <WrappedComponent {...this.props} />;
    }
  };
}

class MyComponent extends React.Component {
  render() {
    return <div>{this.props.data}</div>;
  }
}

//使用高阶函数
export default Control(MyComponent); // 高阶组件
import React, { useState } from 'react';
import MyControlComponent from './Child';

function ParentComponent() {
  const [data, setData] = useState(null);

  // 模拟异步获取数据
  setTimeout(() => {
    setData('Hello from Parent!');
  }, 2000);

  return <MyControlComponent data={data} />;
}

export default ParentComponent;
7.7 Redux 持久化
Redux 持久化可以将 Redux Store 的状态保存到本地存储中,以便在页面刷新后恢复状态。
import { persistStore, persistReducer } from 'redux-persist';
import storage from 'redux-persist/lib/storage'; // localStorage
// import storageSession from 'redux-persist/lib/storage/session'; // sessionStorage
import autoMergeLevel2 from 'redux-persist/lib/stateReconciler/autoMergeLevel2';

const persistConfig = {
  key: 'root',
  storage,
  stateReconciler: autoMergeLevel2 // 控制新老状态如何合并
};

const persistedReducer = persistReducer(persistConfig, reducer);

const store = createStore(persistedReducer);
const persistor = persistStore(store);

export { store, persistor };
import { PersistGate } from 'redux-persist/integration/react';
import { store, persistor } from './store';
ReactDOM.render(
<Provider store={store}>
<PersistGate loading={null} persistor={persistor}>
<App />
</PersistGate>
</Provider>,
document.getElementById('root')
);八.UI组件库
Ant Design 是一个致力于提升『用户』和『设计者』使用体验的设计语言 ;旨在统一中台项目的前端 UI 设计,屏蔽不 必要的设计差异和实现成本,解放设计和前端的研发资源; 包含很多设计原则和配套的组件库。
- ant-design (PC端)
https://ant.design/index-cn https://ant-design.gitee.io/index-cn (镜像库,快)
- antd-mobile (移动端)
https://mobile.ant.design